For more info, visit:
Cedar Creek Gallery
1150 Fleming Rd.
Creedmoor, NC 27522
919-528-1041
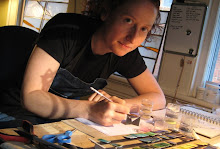
For the opening, I created a little "How it's Made" photo montage. It documents every step of the creation process:
 | |
A sketch is made of the design and the enamel colors are chosen. |
 |
The designs are printed out on paper and glued to a sheet of fine silver. Holes are drilled in the middle pieces to allow the saw blade to be threaded through and make the interior cuts. |
 |
The interior shapes are cut out first. |
 |
The exterior shapes are cut out and sides are filed smooth. |
 |
| Add caption |
 |
The bases are cut out. They are larger than the top pieces. |
 |
A copper solution is painted on the reverse side where the two sheets of silver touch. This will lower the melting temperature and allow for easier fusing. |
 |
The pieces are set on a tripod and torched from below until they are fused into one solid piece. |
 |
The extra material is cut away and the base is ground smooth. |
 |
Texture is added with a scribe. |
 | |
The base is domed using a soft mallet. |
 |
To prevent cloudiness in the finished enamel color, the enamels are "washed" 7-9 times in distilled water. A small amount of powder is placed in a cup, topped with water, and allowed to settle. The water is then poured off, along with the impurities. |
 |
| The enamel is washed and ready to apply! |
|
Different gauges of fine silver wire are flatted using a rolling mill. |
 |
The wires are shaped into swirls and circles to match the design. |
 |
The wires are arranged on sticky tape that will hold them in place until ready to be used. |
 |
After two coats of colored enamel on the reverse of the base, a fine coat of clear enamel is fired in the kiln. |
 |
The wires are carefully positioned in the base. Clear enamel is sifted gently on top, and the piece is fired in the kiln. For more complicated designs, this may be done in stages. |
 |
After firing, the wires are gently pushed down with fingers to make sure they are flush with the base. |
 |
The colored enamels are placed between the wires using a fine sable brush. |
 |
The colors can be blended using water. |
 |
Before firing, the enamels are allowed to dry thoroughly. If wet enamels are placed in the kiln, there will be air bubbles. |
 |
The layers of enamel are built up until they are higher than the exterior of the silver. |
 |
The piece is affixed with wax to a wooden shim, and the top coat is ground flush to the metal. |
 |
After the first grind, the glass and silver are polished by hand using progressively finer sheets of wet sandpaper. |