Thursday, July 30, 2009

A fresh start!


I've said it before, but I do love working on many, many pieces at once. I've got tons of ideas, and it's just too hard to choose which ones to make next, so I usually just make everything. It really brings each step into perfect focus if you get to spend days doing one simple step. Warren read somewhere that to become the master of a task, you should do it for 10,000 hours. I must be getting pretty close by now!

For this new batch, I spent two solid days just cutting out all the shapes. I'm trying something new with this batch. For the earrings, I've switched to 22 gauge fine silver. I'm making some larger earrings this go-around, and I was concerned that they might be uncomfortably heavy for the wearer. That, and I've had a couple of 22 gauge silver sheets hanging around my studio for ages, and I need to use them for something!

The bases need to be fused, as opposed to soldered, because the enamels hate solder. I set up a little tripod and heat the two pieces from beneath. I've tried doing it from the top, but the smaller cutout tends to heat up way too fast and will melt long before the larger sheet underneath comes up to temperature. It's a very intuitive process- I keep my torch moving and try to heat everything up evenly. Just as things start glowing a dull orange, I'll look for the barest shimmer of melting silver. It happens lightning fast. At that moment, you need to draw the shimmer across the whole surface and then pull away! One moment to long, and the silver will pool into a sad little puddle.

The 22 gauge was tricky, since it was thinner that I'm used to. I did finally get the hang of it, but I have to say that 20 gauge is way more satisfying. Here are some fused pieces:


Not sure you can tell, but here's a pic of what I'm looking for in a perfectly fused piece. Do you see that perfect line of silver where the two pieces meet? The edges are still crisp, and the surface of the silver has taken on a strange and lovely crystalline appearance. And the two pieces have become one solid unit:

Besides the 22 gauge silver, I had one other challenge with this set of designs. My dragon necklace is the largest single piece of fused silver that I've ever done. I wasn't sure it was even going to be possible to fuse such a large piece. I approached it a little differently than I would a smaller piece. Instead of trying to do it all in one go, I fused it in stages, and hammered it flat in between. It took seven torchings, and each one was agonizing, but it all finally came together. The final necklace will consist of two pieces. The second wing will be connected with loops to the main body. You'll just have to wait and see:

Lastly, here's a pic of my friend Betty McKim, who is getting ready for all her upcoming shows, and who is a phenomenal jeweler! I love working at Pullen and chit-chatting with Betty!
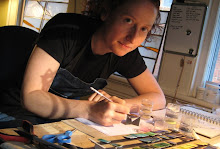
Thursday, July 23, 2009

Finished Work!

Here are the finished pieces, hot off the presses!


Sorry, can't stick around to chat this morning, as I'm off to Pullen to work on my next batch of jewelry. I don't have a torch system in my studio yet, so I do all my fusing at the Pullen Park Arts center. They have an awesome jewelry studio, and it only costs a dollar a day to go use it. Even better, it's a mile from our house, and I can chat with my friend Betty while I work!

Things I'm just getting started on now: A crazy dragon necklace, an elephant, an intricate lotus flower necklace, some funky garden pins, and some new earring designs. It's all very exciting! I've got all the silver all cut out, and now I just need to fuse it all together to make my bases. I've never done pins before, so that will be interesting. I'm going to actually make settings for those, but more on that later...

Ciao for now!

Tuesday, July 14, 2009

Applying the Colored Enamels


For some reason, I didn't take a many pictures of this particular step. I promise to remedy that in the next batch of jewelry. I use Japanese leaded enamels, but I met the Bovano guys at my last show, and I keep meaning to get some samples from them. Part of the pure pleasure of enameling is seeking out new colors and making samples. Here's a picture of my color samples:


As most of you know, the enamels are in powder form. Before use, they need to be washed, so that all the little bits of dust and micro-particles will be removed and the enamels will be pure, delicious, and vibrant. (and not cloudy!). I put a little enamel powder in a cup and top off with distilled water. After letting things settle, I pour off all the water into a large bucket. I'll repeat this process at least 7 or 8 times, maybe more, maybe less. Depends. When things settle and the water is perfectly crystal clear, you're done.

Since these are leaded enamels, I always wear a respirator until all the enamels are under water. (And, for the record, I use unleaded enamels on the reverse sides of my jewelry, because I just don't like to sift leaded if I don't have to.) Safety first, you guys!

Friday, July 10, 2009

The Enameling of Enameling (Finally!)

And now we get to the fun part. This is where things really start coming together, and you start to see the final piece come together. It's all very exciting!

When I make my wires, I always leave them a little long and trim them as I'm actually putting them in place. A little extra care when laying in your wires will save you grief down the enameling road, I promise. I never start attaching wires at the end of the day, because things tend to get a little sloppy. I have a love/hate relationship with Klyr-Fire. (It's sort of like glue, and holds things in place before you fire them). It supposedly burns off in the kiln, but I've found that it can make the enamels a little discolored or cloudy, so use it in extreme moderation. In fact. I prefer just a little distilled water when I can get away with it. I'll usually attach my wires in two separate firings.

The process itself is very simple:
  • I wet the piece with water (and the minutest amount of Klyr-Fire) using a large brush.
  • With tweezers, I set the wire in place, allowing surface tension to hold things together.
  • Get all the wires in place, keeping things moist, and swearing as needed. (this can be a huge pain in the ass, especially if you've got lots of very little wires- they like to stick together or wander away)
  • When it's perfect (and, really, this needs to be the case), the most gentle sifting of clear enamel over the whole thing. Less is more here.
  • Dry.
  • Fire.
The above pic would be the first firing, just getting the big elements in place. Here's the Baroque necklace with all the wires fired in place:

Here's the Cat and Mouse necklace (I think I'm going to call it "Mon Ami". Maybe.) with the wires all fired in place and ready for some color:

Wednesday, July 8, 2009

On the Bending of Cloisonné Wires...


When I tell people that I do cloisonné enamels, the most common response is usually "Oh, I could never bend all those tiny little wires!"

Well, I'm here to say that, truly, most assuredly, you could. It's not about having great eyesight either. It's mostly about practice and touch. I love bending wires. It's probably the most time consuming step (well, besides grinding and polishing, but more on that later), and it's very zen. All the design work is done, so there's no thinking involved. I like to listen to audio books while I bend wire.

I don't use that store bought cloisonné strip- I buy fine silver wires of various gauges and roll it in my little rolling mill. That way, I have more control over the thickness and depth of the strip, and it makes a big difference in my designs. I'll usually do the outlines first (the hardest because they actually need to be pretty precise), then fill in with lots of swirls and whatnot. If I know I'm doing lots of swirls, I'll just spend an hour or two (or three) making tons of them. I can make a swirl with my eyes closed. Sometimes I dream about making swirls, which can get pretty irritating.


Tuesday, July 7, 2009

The Way of Champlevé

The first step, obviously, is to come up with a design. Here's my initial design for the wasp necklace. I sketched it out, chose my color pallet, and cut the main shape out of Fine Silver. I'll fuse those two sheets together to form my base:


I always work on several projects at once. If I were to only do one at a time, it would take a lot longer, and it would become too precious-- I'd never take any chances. I'm making five separate necklaces in this particular run. After I've fused the two pieces of fine silver together, I cut out the exterior shape (yes, a bat necklace!):

Here are all my bases ready for some wire inlay and enamels:

I counter enamel the backs first:

Reds and browns look beautiful when enameled over gold leaf, which is applied before I've laid the wires down:

Monday, July 6, 2009

Welcome to my BenchBlog!


It's been great settling into our new house and getting my studio all fitted out, but times a'wasting, and, as Warren loves to say, "I've fooled around long enough!" As luck would have it, I have some new work to share...

I just finished up several pieces, and I've taken photos along the way. Many people have no idea how cloisonne enamels are made, so hopefully this will serve to enlighten those unfamiliar with the process. This is just how I do them, though, so don't imagine for a moment that I'm the final word on the subject.

First, here's a pic of my studio:


It's huge compared to my last space! I've got my desk facing out, so I can look out the windows as I work. My little kiln is right behind my desk, so it's easy to transfer work from one to the other. I even have a little table to lay things out on, and Miss kitty has her spot by the window.
 
www.SandraMcEwen.com